
Drum Mapping Guide
If you run into any trouble while following these instructions, drop by #help-line in the Clone Hero Discord server with your issue/question.
Rock Band Kits
Rock Band 3's Pro Drums layout is the primary format that Clone Hero supports. Mapping Rock Band kits is fairly self-explanatory, but there are a couple specifics to look out for if you have cymbals.
This section also applies to Midi Pro Adapters and ION Drum Rockers. If you're using the MPA for an e-kit, consider using a MIDI connection and the native MIDI mapper instead, see the MIDI e-kits section. If you're set on using the MPA, continue onward.
Xbox 360, PS3, and Wii Without Cymbals
These kits have little to no special considerations and are fairly trivial to set up.
Connection instructions:
Xbox 360
- Wired: Just plug in to your PC. (Not compatible with Mac.)
- Wireless: Sync to an Xbox 360 wireless receiver. (Not compatible with Mac.)
Wii and PS2/3
- Wired: Just plug in to your PC.
- Wireless: Plug in the wireless dongle and sync the kit to it.
Mapping instructions:
-
Press Space on the main menu to open the control mapper. Use the Controller column on the right to configure your controls.
-
IMPORTANT: Remove any existing default mappings. Clone Hero's default mappings only work correctly for guitars, and you may run into issues if you don't remove any defaults first.
-
Map the D-pad and Start/Select buttons to their respective mappings:
Mapping Control Xbox 360 PS3/Wii Strum Up D-pad up D-Pad Up PoV Hat Up Strum Down D-pad down D-Pad Down PoV Hat Down Start Button Start Start Button 9 Select Button
Select Back Button 8 Left D-pad left D-Pad Left PoV Hat Left Right D-pad right D-Pad Right PoV Hat Right -
Map the pads and kick to their respective inputs in the control mapper:
Mapping Control Xbox 360 PS3/Wii Red Red pad B Button 2 Yellow Yellow pad Y Button 3 Blue Blue pad X Button 0 Green Green pad A Button 1 Orange Kick pedal Left Bumper Button 4 2x Kick 2nd kick pedal Left Stick Button Button 5 -
Click Done to close the control mapper.
-
Press Start to open your profile settings, then set the Controller setting to Drums.
-
Once all that is done, you should be good to go.
Some notes:
- When selecting the first song of a game session, make sure to pick Change Instruments and select Drums from the list, as the default is Pro Drums which has cymbals.
- You can use the yellow and blue pads to scroll up and down in the menus by default. If you don't want that, you can disable Drum Pad Scrolling in Settings > General.
Xbox 360, PS3, and Wii With Cymbals
Clone Hero has some special mappings for these kits, which are automatically assigned when mapping the pads and cymbals. These kits use button combos to differentiate between pad hits and cymbal hits, so special attention is needed when mapping things here.
Connection instructions:
Xbox 360
- Wired: Just plug in to your PC. (Not compatible with Mac.)
- Wireless: Sync to an Xbox 360 wireless receiver. (Not compatible with Mac.)
Wii and PS2/3
- Wired: Just plug in to your PC.
- Wireless: Plug in the wireless dongle and sync the kit to it.
Mapping instructions:
-
Press Space on the main menu to open the control mapper. Use the Controller column on the right to configure your controls.
- IMPORTANT: Remove any existing default mappings. Clone Hero's default mappings only work correctly for guitars, and you will run into issues if you don't remove any defaults first.
- At minimum, you must remove the default mappings for Green, Red, Yellow, Blue, Orange, and 2x Kick.
- If you are using an Xbox 360 kit, you must unbind 2x Kick if you do not have a second pedal connected, otherwise your cymbals will activate the kick pedal as well.
-
Map the D-pad and Start/Select buttons to their respective mappings:
Mapping Control Xbox 360 PS3/Wii Strum Up D-pad up D-Pad Up PoV Hat Up Strum Down D-pad down D-Pad Down PoV Hat Down Start Button Start Start Button 9 Select Button
Select Back Button 8 Left D-pad left D-Pad Left PoV Hat Left Right D-pad right D-Pad Right PoV Hat Right -
Map the pads and cymbals to their respective inputs in the control mapper (input names are provided for reference, do not map these using the face buttons):
Mapping Drums Xbox 360 PS3/Wii Red Red pad B Button 2 Yellow Yellow pad Y Button 3 Blue Blue pad X Button 0 Green Green pad A Button 1 Orange Kick pedal Left Bumper Button 4 2x Kick 2nd kick pedal Left Stick Click Button 5 Yellow Cymbal Yellow cymbal Y Button 3 Blue Cymbal Blue cymbal X Button 0 Green Cymbal Green cymbal A Button 1 - If you're using Lefty Flip, the green cymbal is reused as red cymbal. Use the cymbal plugged into the green cymbal port as red cymbal:
Mapping Drums Yellow Cymbal Yellow cymbal Blue Cymbal Blue cymbal Green Cymbal Red cymbal
- Some notes:
- The same-color pad and cymbal inputs should be duplicates of each other. For example, if Blue maps as button 0, Blue Cymbal should map as button 0.
- You must use the pads and cymbals on their respective inputs only. If you don't, Drum Pad Modifier and Drum Cymbal Modifier will get mapped incorrectly.
- On Xbox 360 kits, you will need to hit relatively hard to get proper mappings, otherwise the velocity axes will get mapped instead. If you get anything other than A, B, X, or Y when mapping the pads/cymbals, try again.
- If you're using Lefty Flip, the green cymbal is reused as red cymbal. Use the cymbal plugged into the green cymbal port as red cymbal:
-
Scroll down to the bottom of the list and check that the following mappings have become set automatically to the following inputs:
Mapping Xbox 360 PS3/Wii Drum Pad Modifier Right Stick Button Button 10 Drum Cymbal Modifier Right Shoulder Button 11 CymExt1 D-pad Up PoV Hat Up CymExt2 D-pad Down PoV Hat Down If any of them are blank or mapped to something else, try mapping your pads/cymbals again. Something went wrong or you forgot to (re-)map something. With Xbox 360 kits, you need to make sure to hit hard or else it may map an axis instead of a button.
-
Click Done to close the control mapper.
-
Press Start to open your profile settings, then set the Controller setting to Drums.
-
Once all that is done, you should be good to go. If you're getting screwy inputs in-game, double-check that all inputs mentioned above are mapped correctly. If you're unsure, reset your mappings and start again from step 2.
Some notes:
- By default, you can use the yellow and blue pads to scroll up and down in the menus. This can be disabled by toggling Drum Pad Scrolling in Settings > General.
- There is no way to toggle individual cymbals on or off for Pro Drums. If you only have two cymbals, you may select 5 Lane Drums in your profile's Controller setting as a workaround. It moves blue cymbal to green cymbal and yellow tom to blue tom to make 4-lane Pro charts playable on 5-lane kits, which means you'll be able to use your cymbals at the expense of not using one of the pads.
Xbox One
Xbox One drumkits require an Xbox One wireless receiver, along with additional software.
- On Windows you will need RB4InstrumentMapper.
- On Linux, the xone driver has support for the MadCatz drumkit. PDP drumkits are likely not supported yet.
- No software currently exists for Mac. You will not be able to use these drumkits there.
Trouble syncing on Windows?
Some guitars/drumkits might not sync properly when using just the sync button. This includes the PDP drumkit. Follow these steps to sync your device correctly:
- Go to Windows settings > Devices > Bluetooth & other devices.
- Click "Add Bluetooth or other device" and pick the "Everything else" option.
- Press and hold the sync button until the Xbox button light flashes quickly.
- You should see "Xbox compatible game controller" in the list, select it.
- If that doesn't work, restart your PC and try again.
After setting up the required software, you can then map your controls in-game:
-
Press Space on the main menu to open the control mapper. Use the Controller column on the right to configure your controls.
- IMPORTANT: Remove any existing default mappings. Clone Hero's default mappings only work correctly for guitars, and you will run into issues if you don't remove any defaults first.
- At minimum, you must remove the default mappings for Green, Red, Yellow, Blue, Orange, and 2x Kick.
- IMPORTANT: Remove any existing default mappings. Clone Hero's default mappings only work correctly for guitars, and you will run into issues if you don't remove any defaults first.
-
Map the D-pad and Start/Select buttons to their respective mappings:
Mapping Control RB4IM (ViGEmBus) RB4IM (vJoy) Strum Up D-pad up D-Pad Up PoV Hat Up Strum Down D-pad down D-Pad Down PoV Hat Down Start Button Start Start Button 14 Select Button
Select Back Button 15 Left D-pad left D-Pad Left PoV Hat Left Right D-pad right D-Pad Right PoV Hat Right -
Map the pads and cymbals to their respective inputs in the control mapper (input names are provided for reference, do not map these using the face buttons):
Mapping Drums RB4IM (ViGEmBus) RB4IM (vJoy) Red Red pad B Button 0 Yellow Yellow pad Y Button 1 Blue Blue pad X Button 2 Green Green pad A Button 3 Orange Kick pedal Left Bumper Button 4 2x Kick 2nd kick pedal Left Trigger Button 8 Yellow Cymbal Yellow cymbal Left Stick Button Button 5 Blue Cymbal Blue cymbal Right Stick Button Button 6 Green Cymbal Green cymbal Right Bumper Button 7 - If you're using Lefty Flip, the green cymbal is reused as red cymbal. Use the cymbal plugged into the green cymbal port as red cymbal:
Mapping Drums Yellow Cymbal Yellow cymbal Blue Cymbal Blue cymbal Green Cymbal Red cymbal
- If you're using Lefty Flip, the green cymbal is reused as red cymbal. Use the cymbal plugged into the green cymbal port as red cymbal:
- Click Done to close the control mapper.
-
Press Start to open your profile settings, then set the Controller setting to Drums.
-
Once all that is done, you should be good to go. If you're getting screwy inputs in-game, double-check that all inputs mentioned above are mapped correctly. If you're unsure, reset your mappings and start again from step 2.
PS4
PS4 drumkits connect via bluetooth and can be partially mapped without any additional software, but you won't be able to map both the pads and cymbals at the same time. On Windows, a program called Minatsuki fixes that issue by remapping some inputs that CH can't see to keyboard keys. Currently, no similar software exists for other platforms.
To install Minatsuki:
- Download and install Python.
- Make sure to check the
Add to PATHoption in the installer, otherwise it will not work!
- Make sure to check the
- Go to the Minatsuki repo and click on the green Code button in the top-right, then select Download ZIP.
- Extract the zip to a new folder in somewhere such as your desktop.
- Open that folder and any subfolders inside of it until there are no more folders to open.
- Shift+right-click in the empty space below all of the files and select
Open command prompt here/Open PowerShell window hereto open a command prompt window.- If you're on Windows 11 or have Windows Terminal installed on 10, you can also hit
Open in Terminal.
- If you're on Windows 11 or have Windows Terminal installed on 10, you can also hit
- In the command prompt, type
pip install -r requirements.txtto install Minatsuki's dependencies.
To start Minatsuki, you will need to open the console each time and type in python main.py.
Easier Run Setup
Optionally, you may create a batch script to run the last command for you instead of re-opening the command prompt and doing it yourself.
- Create a new text file, open it in Notepad, paste in
python main.py. - Go to the File tab and select Save As.
- Select
All Files (*.*)from theSave as typedropdown. - Name the file anything ending with
.bat, for example,Minatsuki.bat, then hit Save.
Now you can simply double-click that .bat file any time you need to run Minatsuki.
Once you have Minatsuki set up, you can now map your controls:
-
Press Space on the main menu to open the control mapper. Use the Keyboard column on the left to configure your controls, not the Controller column on the right.
-
Map the pads and cymbals to their respective inputs in the control mapper:
Mapping Drums Keyboard column Red Red pad C Yellow Yellow pad F Blue Blue pad G Green Green pad N Orange Kick pedal Space Yellow Cymbal Yellow cymbal J Blue Cymbal Blue cymbal A Green Cymbal Green cymbal X - If you're using Lefty Flip, the green cymbal is reused as red cymbal. Use the cymbal plugged into the green cymbal port as red cymbal:
Mapping Drums Yellow Cymbal Yellow cymbal Blue Cymbal Blue cymbal Green Cymbal Red cymbal
- If you wish to use a second pedal, you will still need to use the Controller column for that, as Minatsuki does not remap it for you.
Mapping Drums Controller column 2x Kick 2nd kick pedal Button 5
- If you're using Lefty Flip, the green cymbal is reused as red cymbal. Use the cymbal plugged into the green cymbal port as red cymbal:
-
Click Done to close the control mapper.
-
Press Start to open your profile settings, then set the Controller setting to Drums.
-
Once all that is done, you should be good to go.
Guitar Hero Kits
Clone Hero doesn't support a visual 5-lane layout, and there are no plans to add it in the future. However, 5-lane charts are still supported by the game: it auto-converts them to 4-lane Pro. It can also auto-convert 4-lane Pro charts to be playable on a 5-lane kit. Since these auto-conversions use specific notes, GH kits need to be mapped in a specific way to be used as intended.
Connection instructions:
Xbox 360
Sync to an Xbox 360 wireless receiver.
PS2/3
Plug in the wireless dongle and sync the kit to it.
Wii
To use wired, use one of the adapters listed here. Note that the EMiO Edge does not support drums, only the Raphnet and Santroller-based adapters do.
To use wirelessly:
- Windows: Use WiitarThing.
- Mac: Only currently known method is using OSCulator. Not particularly recommended, as it is a paid program, and pairing Wiimotes doesn't seem to be possible on macOS 12 Monterey or onward currently.
- Linux: Natively supported, just sync the Wiimote via Bluetooth. Make sure to hit Assign Controller in the control mapper to assign the correct device.
Mapping instructions:
-
Press Space on the main menu to open the control mapper. Use the Controller column on the right to configure your controls.
-
If any of the inputs are automatically mapped, remove them all before continuing, otherwise your controls might not work correctly.
-
Map the D-pad (or analog stick on Wii drums) to Strum Up/Down and Left/Right, and the Start/Select buttons (or +/- on Wii drums) to Start and Select.
-
Map the pads and cymbals according to this list:
Mapping Drums Xbox 360/WiitarThing PS3 Raphnet Red Red pad B Button 2 Button 1 Blue Blue pad X Button 0 Button 3 Green Green pad A Button 1 Button 0 Yellow Cymbal Yellow cymbal Y Button 3 Button 2 Green Cymbal Orange cymbal Right Bumper Button 5 Button 4 Orange Kick pedal Left Bumper Button 4 Button 5 - If you're using Lefty Flip, you'll need to change some of these to correspond to the flipped notes. Map your yellow cymbal to Green Cymbal (which will become red cymbal in-game), orange cymbal to Blue Cymbal, and blue pad to Yellow:
Mapping Drums Green Cymbal Yellow cymbal Blue Cymbal Orange cymbal Yellow Blue pad
- If you're using Lefty Flip, you'll need to change some of these to correspond to the flipped notes. Map your yellow cymbal to Green Cymbal (which will become red cymbal in-game), orange cymbal to Blue Cymbal, and blue pad to Yellow:
-
Click Done to close the control mapper.
-
Press Start to open your profile settings, then set the Controller setting to 5 Lane Drums. This will convert 4-lane pro charts to work with 5-lane kits. Again, there is no visual 5-lane layout, you will still have only 4 lanes.
-
Once all that is done, you should be good to go.
Some notes:
- Be sure to check the Chart Auto-Conversions section of this guide further down if you want to know how CH handles 5-lane charts, and what the 5 Lane Drums controller type does.
- By default, anything mapped to Yellow and Blue will scroll up and down in the menus. This can be disabled by toggling Drum Pad Scrolling in Settings > General. (This does not apply to Yellow Cymbal and Blue Cymbal currently, which means that if you followed this guide, the only pad that will do navigation is blue, which will scroll down. You will have to use the proper navigation buttons on the kit for scrolling up.)
MIDI E-kits
Clone Hero has a built-in MIDI mapper for e-kits (or any other MIDI device, if you're brave enough to use something like a MIDI keyboard as drums). It supports multiple MIDI notes per mapping, and individual MIDI note velocity thresholds.
If you're using a Rock Band Midi Pro Adapter for your e-kit, consider using it through a direct MIDI connection instead, either through the USB-B port on your kit if it has one, or a MIDI-to-USB cable. If you must the MPA, follow the Rock Band Kits section instead.
Connection instructions:
- Connect your e-kit with either a USB-B-to-USB-A (printer) cable, or a MIDI cable connected to the MIDI Out port of the kit, depending on what's available and which your preference is.
- If you are on Windows, make sure all other software that can use MIDI inputs are closed to ensure that your e-kit isn't being blocked by other software. If you need to use it with multiple programs at once, you can use MIDI loopback software such as loopMIDI.
-
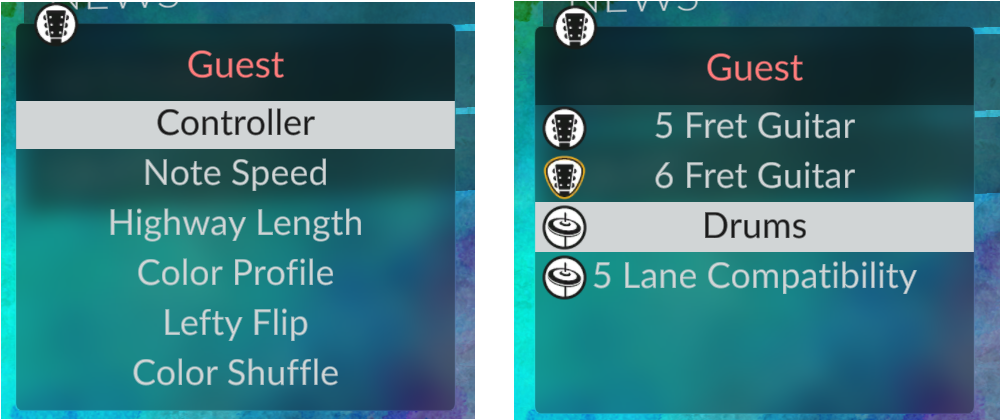
Use your keyboard or a controller and press the key/button mapped to Start to open your profile settings, then set the Controller setting to Drums.
-
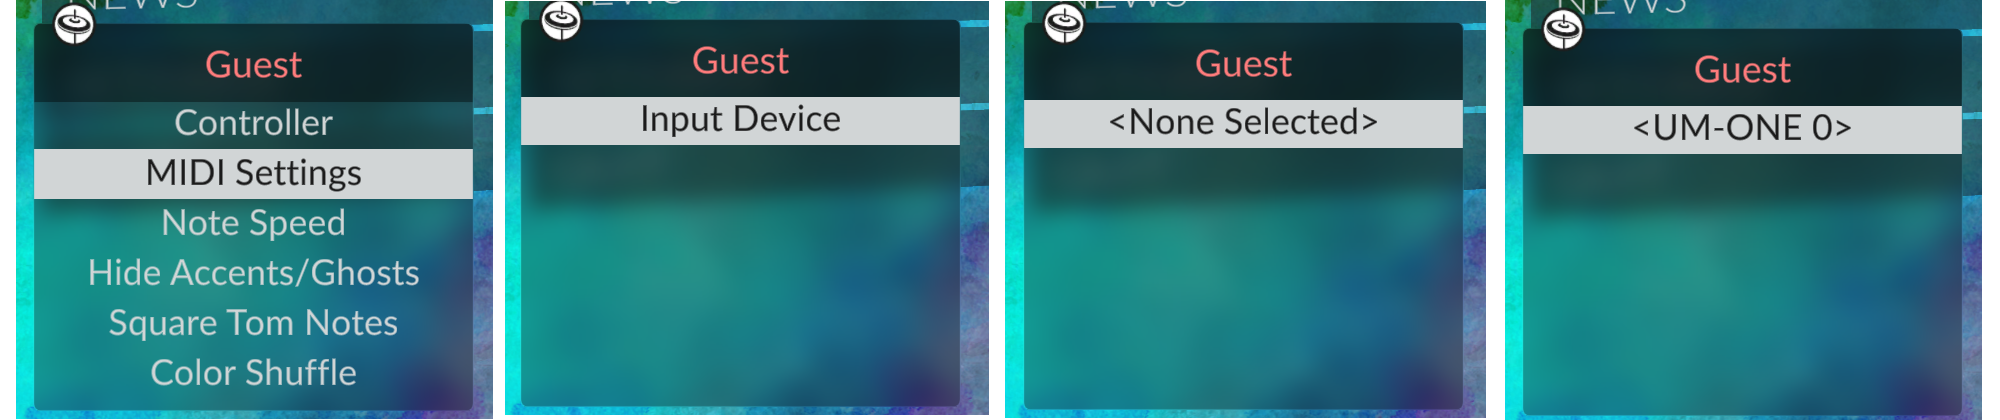
Still in your profile, go into MIDI Settings and select your drums in the Input Device option. (You'll see
<None Selected>at first. Use Up/Down to change the setting from<None Selected>, then when you see your kit, press Green to select it.)
-
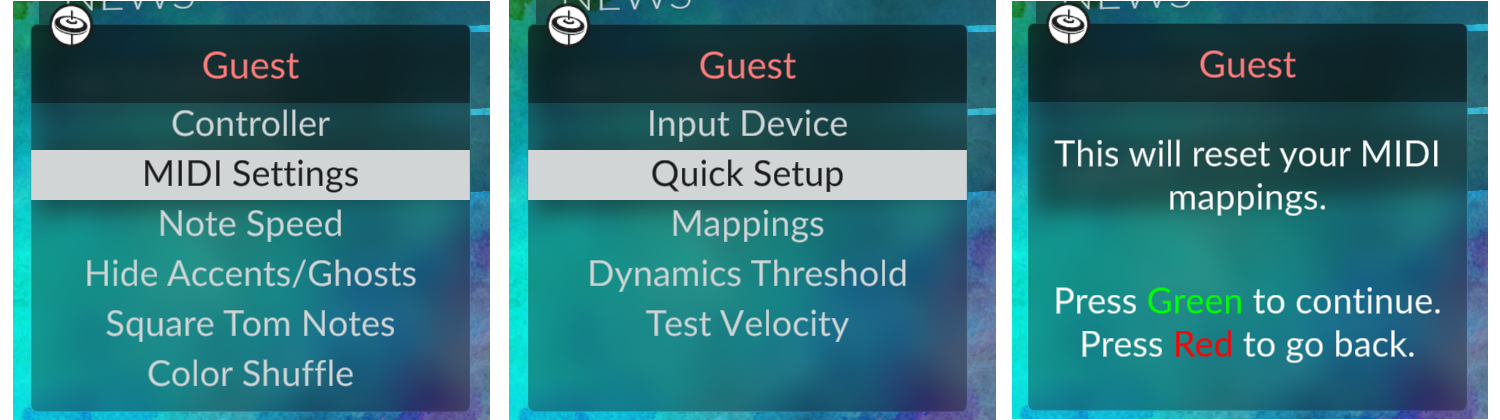
Go into Quick Setup and follow the instructions given.

Mapping Drums Red Pad Snare Yellow Pad High tom Blue Pad Middle tom Green Pad Low tom Orange Pad Kick Yellow Cymbal Hi-hat cymbal Blue Cymbal Ride cymbal Green Cymbal Crash cymbal - If you're using Lefty Flip, the chart layout will be flipped, and you should instead map them like this:
Green Cymbal is re-used as red cymbal on Lefty Flip.Mapping Drums Red Pad Low tom Yellow Pad Middle tom Blue Pad High tom Green Pad Snare Orange Pad Kick Yellow Cymbal Ride cymbal Blue Cymbal Hi-hat cymbal Green Cymbal Crash cymbal
- If you're using Lefty Flip, the chart layout will be flipped, and you should instead map them like this:
-
If applicable, make sure to enter Mappings and map any additional hit zones on your pads/cymbals, and also make sure that both the open and closed hi-hat inputs are mapped to Yellow Cymbal.
-
Optionally, you may map an additional pad or cymbal to Start or Select in the Mappings menu of your MIDI settings. If you can't do this or choose not to, you should have a controller or keyboard on standby so you can pause.

You can continue to use the keyboard or a controller to navigate the menus, but Clone Hero by default will allow you to use the yellow and blue pads to scroll up and down by default. This can be disabled by toggling Drum Pad Scrolling in Settings > General.
If you wish to use a controller for menu navigation, here are some suggested mappings:
| Mapping | Controller |
|---|---|
| Strum Up | D-pad Up/Left Stick Up |
| Strum Down | D-pad Down/Left Stick Down |
| Left | D-pad Left/Left Stick Left |
| Right | D-pad Right/Left Stick Right |
| Mapping | Xbox | PlayStation | Nintendo |
|---|---|---|---|
| Green | A | × | A |
| Red | B | ○ | B |
| Yellow | Y | Δ | X |
| Blue | X | □ | Y |
| Orange | LB | L1 | L |
Chart Auto-Conversions
This isn't quite related to the overall topic of this guide, but it's still important to know to clear some confusion.
5-lane drum charts get automatically converted to 4-lane Pro in CH, regardless of your drum kit type:
| 5-lane Chart | Conversion |
|---|---|
| Red | Red |
| Yellow | Yellow cymbal |
| Blue | Blue tom |
| Orange | Green cymbal |
| Green | Green tom |
| Orange + Green | G cym + B tom |
This conversion also gets converted again down to standard 4-lane if you're not using Pro Drums.
Additionally, the 5 Lane Drums controller type in your profile converts 4-lane Pro charts to be entirely playable on a 5-lane kit:
| 4-lane Pro | Conversion |
|---|---|
| Red | Red |
| Yellow cymbal | Yellow cymbal |
| Yellow tom | Blue tom |
| Blue cymbal | Green cymbal |
| Blue tom | Blue tom |
| Green cymbal | Green cymbal |
| Green tom | Green tom |
| Y tom + B tom | R + B tom |
| B cym + G cym | Y cym + G cym |